2017년 11월 3일 금요일

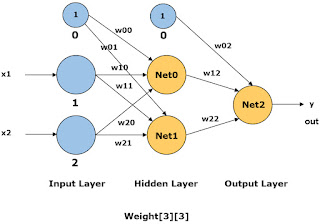
[Neural Network] Multi-Layer Perceptron for XOR pattern (in C++)


Machine Learning, Tom Mitchell, McGraw Hill, 1997.
http://www.cs.cmu.edu/~tom/mlbook.html
_______________________________________________________________

#define BP_LEARNING(float)(0.5)// The learning coefficient.
class CBPNet{
   public:
CBPNet();
~CBPNet() {};
float Train(float, float, float);
float Run(float, float);
   private:
float m_fWeights[3][3];// Weights for the 3 neurons.
float Sigmoid(float);// The sigmoid function.
};

CBPNet::CBPNet()
{
srand((unsigned)(time(NULL)));
for (inti=0;i<3;i++) {
for (intj=0;j<3;j++) {
m_fWeights[i][j] = (float)(rand())/(32767/2) -1;
}
}
}
float CBPNet::Train(floati1, float i2, float y) {
float net1, net2, i3, i4, out;
// Calculate the net values for the hidden layer neurons.
net1 = 1 * m_fWeights[0][0] + i1 * m_fWeights[1][0] + i2 * m_fWeights[2][0];
net2 = 1 * m_fWeights[0][1] + i1 * m_fWeights[1][1] + i2 * m_fWeights[2][1];
// Use the activation function-the Sigmoid.
i3 = Sigmoid(net1);
i4 = Sigmoid(net2);
// Now, calculate the net for the final output layer.
net1 = 1 * m_fWeights[0][2] + i3 * m_fWeights[1][2] + i4 * m_fWeights[2][2];
out = Sigmoid(net1);
// We have to calculate the errors backwards from the output layer to the hidden layer
float deltas[3];
deltas[2] = out*(1-out)*(y-out);
deltas[1] = i4*(1-i4)*(m_fWeights[2][2])*(deltas[2]);
deltas[0] = i3*(1-i3)*(m_fWeights[1][2])*(deltas[2]);
// Now, alter the weights accordingly.
float v1 = i1, v2 = i2;
for(int i=0;i<3;i++) {
// Change the values for the output layer, if necessary.
if (i == 2) {
v1 = i3;
v2 = i4;
}
m_fWeights[0][i] += BP_LEARNING*1*deltas[i];
m_fWeights[1][i] += BP_LEARNING*v1*deltas[i];
m_fWeights[2][i] += BP_LEARNING*v2*deltas[i];
}
return out;
}
float CBPNet::Sigmoid(floatnum) {
return (float)(1/(1+exp(-num)));
}
float CBPNet::Run(floati1, float i2) {
float net1, net2, i3, i4;
net1 = 1 * m_fWeights[0][0] + i1 * m_fWeights[1][0] + i2 * m_fWeights[2][0];
net2 = 1 * m_fWeights[0][1] + i1 * m_fWeights[1][1] + i2 * m_fWeights[2][1];
i3 = Sigmoid(net1);
i4 = Sigmoid(net2);
net1 = 1 * m_fWeights[0][2] + i3 * m_fWeights[1][2] + i4 * m_fWeights[2][2];
return Sigmoid(net1);
}
#define BPM_ITER2000
void main() {
CBPNetbp;
for (inti=0;i<BPM_ITER;i++) {
bp.Train(0,0,0);
bp.Train(0,1,1);
bp.Train(1,0,1);
bp.Train(1,1,0);
}
cout<< "0,0 = " << bp.Run(0,0) << endl;
cout<< "0,1 = " << bp.Run(0,1) << endl;
cout<< "1,0 = " << bp.Run(1,0) << endl;
cout<< "1,1 = " << bp.Run(1,1) << endl;
}


2017년 11월 2일 목요일

[기사] '논문’ 하나로 부동산 광풍을 몰고온 사나이! [출처: 중앙일보] ‘논문’ 하나로 부동산 광풍을 몰고온 사나이! - 중앙일보

http://m.etnews.com/20171005000056?SNS=00002#_enliple

꼭 법대에 진학해야 하는 이유에 대해 그는 훗날 이렇게 회고합니다. "법률은 공정을 추구한다. 권선징악의 학문이다. 법관은 선량해야 하며 약한 민중들을 지탱하는 보루이기 때문이다."

[기사] 日, 인공지능 활용능력 자격시험 만든다 - 전자신문

http://m.etnews.com/20171005000056?SNS=00002#_enliple

[Neural Network] 선형회귀분석 (linear regression) 예제


______________________________________________________________________________
// linear regression
#include <stdio.h>
#include <conio.h>
//#include <float.h>

//
// y = ax + b
//
void main()
{
double a, b;
double X[] = { 0, 1, 2 };
double Y[] = { 1, 3, 2 };
double lr = 0.1;

a = 0.1;
b = 0.0;

double delta_a;
double delta_b;

int n = 0;

double previous_error = 999.0; // DBL_MAX;

while (1)
{
delta_a = 0;
delta_b = 0;
for (int i = 0; i < 3; i++)
{
double y;
y = a * X[i] + b;
delta_a += (Y[i] - y)*X[i];
delta_b += (Y[i] - y);
}
a = a + lr * delta_a;
b = b + lr * delta_b;

double error;
error = 0.0;
for (int i = 0; i < 3; i++)
{
double d;
d = (Y[i] - a*X[i] - b)*(Y[i] - a*X[i] - b);
error += d;
}
error = error / 2.0;

n++;
printf("%d \t %1.6f \t %1.2f \t %1.2f \n", n, error, a, b);

if ((previous_error - error) < 0.000001) break;

previous_error = error;
}
_getch();
}
//
// a=.5 b=1.5
//

[MFC] 버튼에서 WM_MOUSEMOVE 이벤트 처리하기


_____________________________________________________________________________
#pragma once

class CMyBtn : public CButton
{
DECLARE_DYNAMIC(CMyBtn)

public:
CMyBtn();
virtual ~CMyBtn();

protected:
DECLARE_MESSAGE_MAP()

public:
afx_msg void OnMouseMove(UINT nFlags, CPoint point);
};
_____________________________________________________________________________
// MyBtn.cpp : 구현 파일입니다.
//

#include "stdafx.h"
#include "My.h"
#include "MyBtn.h"

IMPLEMENT_DYNAMIC(CMyBtn, CButton)

CMyBtn::CMyBtn()
{

}

CMyBtn::~CMyBtn()
{
}

BEGIN_MESSAGE_MAP(CMyBtn, CButton)
ON_WM_MOUSEMOVE()
END_MESSAGE_MAP()

void CMyBtn::OnMouseMove(UINT nFlags, CPoint point)
{
CDC* pDC;
CWnd* pParent;
pParent = GetParent();

pDC = pParent->GetDC(); // <---- 부모윈도우, 즉 CChildView를 화면출력 기준으로 삼는다.

CString strPos;
strPos.Format(L"%04d %04d", point.x, point.y);

pDC->TextOutW(0, 0, strPos);

pParent->ReleaseDC(pDC);

CButton::OnMouseMove(nFlags, point);
}
_____________________________________________________________________________

// ChildView.h : CChildView 클래스의 인터페이스
//

#pragma once

// CChildView 창
class CMyBtn;

class CChildView : public CWnd
{
// 생성입니다.
public:
CChildView();

// 특성입니다.
public:
CMyBtn* m_pBtn;

// 작업입니다.
public:

// 재정의입니다.
protected:
virtual BOOL PreCreateWindow(CREATESTRUCT& cs);

// 구현입니다.
public:
virtual ~CChildView();

// 생성된 메시지 맵 함수
protected:
afx_msg void OnPaint();
DECLARE_MESSAGE_MAP()
public:
afx_msg int OnCreate(LPCREATESTRUCT lpCreateStruct);
};
_____________________________________________________________________________

// ChildView.cpp : CChildView 클래스의 구현
//

#include "stdafx.h"
#include "My.h"
#include "ChildView.h"
#include "MyBtn.h"

// CChildView

CChildView::CChildView()
{
}

CChildView::~CChildView()
{
}

BEGIN_MESSAGE_MAP(CChildView, CWnd)
ON_WM_PAINT()
ON_WM_CREATE()
END_MESSAGE_MAP()

// CChildView 메시지 처리기

BOOL CChildView::PreCreateWindow(CREATESTRUCT& cs) 
{
if (!CWnd::PreCreateWindow(cs))
return FALSE;

cs.dwExStyle |= WS_EX_CLIENTEDGE;
cs.style &= ~WS_BORDER;
cs.lpszClass = AfxRegisterWndClass(CS_HREDRAW|CS_VREDRAW|CS_DBLCLKS, 
::LoadCursor(NULL, IDC_ARROW), reinterpret_cast<HBRUSH>(COLOR_WINDOW+1), NULL);

return TRUE;
}

void CChildView::OnPaint() 
{
CPaintDC dc(this); // 그리기를 위한 디바이스 컨텍스트입니다.
// TODO: 여기에 메시지 처리기 코드를 추가합니다.
// 그리기 메시지에 대해서는 CWnd::OnPaint()를 호출하지 마십시오.
}

int CChildView::OnCreate(LPCREATESTRUCT lpCreateStruct)
{
if (CWnd::OnCreate(lpCreateStruct) == -1)
return -1;
m_pBtn = new CMyBtn();
m_pBtn->Create(L"CMyBtn", WS_VISIBLE | WS_CHILD | BS_PUSHBUTTON,
CRect(100, 0, 200, 200), this, 999);

return 0;
}
_____________________________________________________________________________

2017년 11월 1일 수요일

[MFC] 메시지처리 기본예제


___________________________________________________________________________

메세지: WM_LBUTTONDOWN
핸들러: OnLButtonDown(...)
맵핑매크로: ON_WM_LBUTTONDOWN()

메세지: WM_MOUSEMOVE
핸들러: OnMouseMove
맵핑매크로: ON_WM_MOUSEMOVE()

메세지: WM_CREATE
핸들러: OnCreate
맵핑매크로: ON_WM_CREATE()

메시지: WM_COMMAND
핸들러: OnXXX() <--- 사용자 정의
맵핑매크로: ON_COMMAND(사용자지정ID, OnXXX)

버튼윈도우 클래스: CButton
에딧윈도우 클래스: CEdit

노티피케이션코드: EN_CHANGE
핸들러: OnXXX()
맵핑매크로: ON_EN_CHANGE(사용자지정ID, OnXXX)

___________________________________________________________________________
메뉴추가: my.rc, IDR_MAINFRAME, ID_TEST_TEST


___________________________________________________________________________
소스코드: CChildView.H

// ChildView.h : CChildView 클래스의 인터페이스
//


#pragma once


// CChildView 창

class CChildView : public CWnd
{
// 생성입니다.
public:
CChildView();
CButton* m_pBtn;
CEdit* m_pEdt1;
CEdit* m_pEdt2;

// 특성입니다.
public:

// 작업입니다.
public:

// 재정의입니다.
protected:
virtual BOOL PreCreateWindow(CREATESTRUCT& cs);

// 구현입니다.
public:
virtual ~CChildView();

// 생성된 메시지 맵 함수
protected:
afx_msg void OnPaint();
DECLARE_MESSAGE_MAP()
public:
afx_msg void OnLButtonDown(UINT nFlags, CPoint point);
afx_msg void OnMouseMove(UINT nFlasg, CPoint pt);
afx_msg void OnTestTest();
afx_msg void OnBtn1();
afx_msg void OnEdt1();
afx_msg int OnCreate(LPCREATESTRUCT lpCreateStruct);
};

___________________________________________________________________________
소스코드: CChildView.CPP

// ChildView.cpp : CChildView 클래스의 구현
//

#include "stdafx.h"
#include "My.h"
#include "ChildView.h"

#ifdef _DEBUG
#define new DEBUG_NEW
#endif


// CChildView

CChildView::CChildView()
{
m_pBtn = NULL;
m_pEdt1 = 0;
m_pEdt2 = 0;
}

CChildView::~CChildView()
{
if (m_pBtn != NULL)
{
m_pBtn->DestroyWindow();
delete m_pBtn;
}
if (m_pEdt1 != NULL)
{
m_pEdt1->DestroyWindow();
delete m_pEdt1;
}
if (m_pEdt2 != NULL)
{
m_pEdt2->DestroyWindow();
delete m_pEdt2;
}
}


BEGIN_MESSAGE_MAP(CChildView, CWnd)
ON_WM_PAINT()
ON_WM_LBUTTONDOWN()
ON_WM_MOUSEMOVE()
ON_COMMAND(ID_TEST_TEST, &CChildView::OnTestTest)
ON_BN_CLICKED(999, &CChildView::OnBtn1)
ON_EN_CHANGE(888, &CChildView::OnEdt1)
ON_WM_CREATE()
END_MESSAGE_MAP()


// CChildView 메시지 처리기

BOOL CChildView::PreCreateWindow(CREATESTRUCT& cs)
{
if (!CWnd::PreCreateWindow(cs))
return FALSE;

cs.dwExStyle |= WS_EX_CLIENTEDGE;
cs.style &= ~WS_BORDER;
cs.lpszClass = AfxRegisterWndClass(CS_HREDRAW|CS_VREDRAW|CS_DBLCLKS,
::LoadCursor(NULL, IDC_ARROW), reinterpret_cast<HBRUSH>(COLOR_WINDOW+1), NULL);

return TRUE;
}

void CChildView::OnPaint()
{
CPaintDC dc(this); // 그리기를 위한 디바이스 컨텍스트입니다.

// TODO: 여기에 메시지 처리기 코드를 추가합니다.

// 그리기 메시지에 대해서는 CWnd::OnPaint()를 호출하지 마십시오.
}


void CChildView::OnLButtonDown(UINT nFlags, CPoint point)
{
// TODO: 여기에 메시지 처리기 코드를 추가 및/또는 기본값을 호출합니다.
this->MessageBox(L"안녕");

CWnd::OnLButtonDown(nFlags, point);
}
void CChildView::OnMouseMove(UINT nFlags, CPoint pt)
{
//HDC dc;
CDC* pDC;
//hdc = ::GetDC(m_hWnd);
pDC = GetDC();
//char szPos[128];
//sprintf(szPos, "%04d %04d", pt.x, pt.y);
//::TextOut(hdc, 0, 0, szPos, strlen(szPos));
CString strPos;
strPos.Format(L"%04d %04d", pt.x, pt.y);
//::TextOut(hdc, 0, 0, strPos, strPos.GetLength());
pDC->TextOutW(0, 0, strPos);

//::ReleaseDC(m_hWnd, hdc);
ReleaseDC(pDC);

CWnd::OnMouseMove(nFlags, pt);
}

void CChildView::OnTestTest()
{
// TODO: 여기에 명령 처리기 코드를 추가합니다.
MessageBox(L"메뉴클릭");
}

void CChildView::OnBtn1()
{
// TODO: 여기에 명령 처리기 코드를 추가합니다.
MessageBox(L"버튼클릭");
}

void CChildView::OnEdt1()
{
// TODO: 여기에 명령 처리기 코드를 추가합니다.
CString strMsg;
m_pEdt1->GetWindowTextW(strMsg);
m_pEdt2->SetWindowTextW(strMsg);
}

int CChildView::OnCreate(LPCREATESTRUCT lpCreateStruct)
{
if (CWnd::OnCreate(lpCreateStruct) == -1)
return -1;

// TODO:  여기에 특수화된 작성 코드를 추가합니다.
if (m_pBtn == NULL)
{
m_pBtn = new CButton();

CRect rect;
rect.left = 100;
rect.top = 0;
rect.right = 200;
rect.bottom = 100;

m_pBtn->Create(L"click",
WS_VISIBLE | WS_CHILD | BS_PUSHBUTTON,
rect, this, 999);
}

if (m_pEdt1 == 0)
{
m_pEdt1 = new CEdit();
m_pEdt1->Create(
WS_VISIBLE|WS_CHILD|WS_BORDER|
ES_MULTILINE,
CRect(0, 100, 200, 200), this, 888);
}

if (m_pEdt2 == 0)
{
m_pEdt2 = new CEdit();
m_pEdt2->Create(
WS_VISIBLE | WS_CHILD | WS_BORDER|
ES_MULTILINE,
CRect(0, 200, 200, 300), this, 777);
}

return 0;
}
___________________________________________________________________________

[Neural Network] Perceptron (in C)

//
// perceptron (without step function)
//

#include <stdio.h>
#include <stdlib.h>
#include <limits.h>
#define TRAIN_SAMPLES 4
void main()
{
//
//training set for OR pattern
//
// input: X
double X[TRAIN_SAMPLES][2] =
{
0, 0, // 클래스 0
0, 1, // 클래스 1
1, 0, // 클래스 1
1, 1 // 클래스 1
};
// target Y
double Y[TRAIN_SAMPLES] =
{
0, 1, 1, 1
};

//
// weight
//
double W[3];
//------------------------------------------------------------
// 1) Training
//------------------------------------------------------------

//
// initialize W
//
for (int i = 0; i < 3; i++)
W[i] = ((double)rand() / RAND_MAX)*0.5 - 0.25;

unsigned int epoch = 0;
unsigned int MAX_EPOCH = 500;
double Etha = 0.05;

double output;
double x1, x2;
double target;
while (epoch++ < MAX_EPOCH)
{
//
// 1 epoch (for all training samples)
//
// compute deltaWi for each Wi
//
double deltaW[3];
for (int i = 0; i < TRAIN_SAMPLES; i++)
{
deltaW[0] = 0.0;
deltaW[1] = 0.0;
deltaW[2] = 0.0;

x1 = X[i][0];
x2 = X[i][1];
target = Y[i];

output = 1 * W[0] + x1 * W[1] + x2 * W[2];

deltaW[0] += (target - output) * 1;
deltaW[1] += (target - output) * x1;
deltaW[2] += (target - output) * x2;
}
//
// update W
//
W[0] = W[0] + Etha * (deltaW[0] / TRAIN_SAMPLES);
W[1] = W[1] + Etha * (deltaW[1] / TRAIN_SAMPLES);
W[2] = W[2] + Etha * (deltaW[2] / TRAIN_SAMPLES);
//
// compute the Error(Cost)
//
double cost;
cost = 0.0;

for (int i = 0; i < TRAIN_SAMPLES; i++)
{
x1 = X[i][0];
x2 = X[i][1];
target = Y[i];

output = 1 * W[0] + x1 * W[1] + x2 * W[2];

cost += (target - output) * (target - output);
}
cost = 0.5 * cost / TRAIN_SAMPLES;

printf("%05d: cost = %10.9lf \n", epoch, cost);
}
printf("training done\n\n");
//------------------------------------------------------------
// 2) Testing for the training set
//------------------------------------------------------------
for (int i = 0; i < TRAIN_SAMPLES; i++)
{
x1 = X[i][0];
x2 = X[i][1];
target = Y[i];
output = 1 * W[0] + x1 * W[1] + x2 * W[2];

printf("%2.1lf %2.1lf (%d) ----- %2.1lf \n", x1, x2, (int)target, output);
}
printf("training test done\n\n");

//------------------------------------------------------------
// 3) Testing for unknown data
//------------------------------------------------------------
x1 = 0.01; // <----- 이 값을 0~1사이로 바꾸어서 테스트 해 봅니다.
x2 = 0.05; // <----- 이 값을 0~1사이로 바꾸어서 테스트 해 봅니다.

double Threshold = 0.3; // <----- 이 값을 바꾸어 최종 클래스 판단처리,
// 나중에 출력을 2개 이상으로 하면 가장 큰 값 나오는 노드를 최종 클래스로 판단

output = 1 * W[0] + x1 * W[1] + x2 * W[2];

int output_class = (output > Threshold) ? 1 : 0;

printf("%2.1lf %2.1lf ----- %2.1lf ----- %d \n", x1, x2, output, output_class);
printf("testing test done\n\n");
}

2017년 9월 22일 금요일

[Win32] 버튼에서 WM_MOUSEMOVE 이벤트 처리하기


#include <windows.h>

LRESULT CALLBACK WndProc(HWND, UINT, WPARAM, LPARAM);
LRESULT CALLBACK BtnProc(HWND, UINT, WPARAM, LPARAM);

WNDPROC _fpBtnProc;

int WINAPI WinMain(HINSTANCE hInstance, HINSTANCE hPrevInstance, LPSTR lpszArg, int nCmdShow)
{
HWND hWnd;
MSG msg;
WNDCLASS WndClass;
WndClass.style = NULL;
WndClass.lpfnWndProc = WndProc;
WndClass.cbClsExtra = 0;
WndClass.cbWndExtra = 0;
WndClass.hInstance = hInstance;
WndClass.hIcon = LoadIcon(NULL, IDI_APPLICATION);
WndClass.hCursor = LoadCursor(NULL, IDC_ARROW);
WndClass.hbrBackground = (HBRUSH)GetStockObject(WHITE_BRUSH);
WndClass.lpszMenuName = NULL;
WndClass.lpszClassName = "Hello";

if (!RegisterClass(&WndClass)) return NULL;

hWnd = CreateWindow(
"Hello",
"My",
WS_OVERLAPPEDWINDOW,
0,
0,
320,
240,
NULL, NULL, hInstance,
NULL
);

ShowWindow(hWnd, nCmdShow);
UpdateWindow(hWnd);

while (GetMessage(&msg, NULL, 0, 0))
{
TranslateMessage(&msg);
DispatchMessage(&msg);
}
return msg.wParam;
}

#include <stdio.h>
#include <string.h>
LRESULT CALLBACK WndProc(HWND hWnd, UINT mesg, WPARAM wParam, LPARAM lParam)
{
static HWND hBtn;

static char szPos[256];

switch (mesg)
{
case WM_CREATE:
hBtn = CreateWindow("button", "",
WS_CHILD | WS_VISIBLE | BS_PUSHBUTTON,
0, 0, 100, 100,
hWnd,
(HMENU)999,
(HINSTANCE)GetWindowLong(hWnd, GWL_HINSTANCE),
NULL);

_fpBtnProc = (WNDPROC)GetWindowLong(hBtn, GWL_WNDPROC);
SetWindowLong(hBtn, GWL_WNDPROC, (LONG)BtnProc);
break;

case WM_MOUSEMOVE:
HDC hdc;
hdc = GetDC(hWnd);
sprintf_s(szPos, "%04d %04d", LOWORD(lParam), HIWORD(lParam));
TextOut(hdc, 100, 0, szPos, strlen(szPos));
ReleaseDC(hWnd, hdc);
break;

case WM_DESTROY:
PostQuitMessage(0);
return FALSE;
}
return DefWindowProc(hWnd, mesg, wParam, lParam);
}
LRESULT CALLBACK BtnProc(HWND hWnd, UINT mesg, WPARAM wParam, LPARAM lParam)
{
static char szPos[256];

switch (mesg)
{
case WM_MOUSEMOVE:
HDC hdc;
HWND hParent;
hParent = GetParent(hWnd);
hdc = GetDC(hParent);
sprintf_s(szPos, "%04d %04d", LOWORD(lParam), HIWORD(lParam));
TextOut(hdc, 100, 16, szPos, strlen(szPos));
ReleaseDC(hParent, hdc);
break;
}
return CallWindowProc(_fpBtnProc, hWnd, mesg, wParam, lParam);
}

2017년 9월 12일 화요일

[python] file

data.csv
1,2,3,4,5,6,7,8,9,10

[numpy]
import numpy as np
data = np.loadtxt('data.csv', delimiter=',', dtype=np.int32)
print(data)
for i, v in enumerate(data):
  print(i, v)

[pickle]
import pickle
color = [1,2,3,4]
pickle.dump(color, open('colors.txt', 'wb'))
color = pickle.load(open('colors.txt', 'rb'))
print(color)

2017년 9월 11일 월요일

[python] sort, sorted, id, copy

In [34]: x = [5, 7, 3, 38, 7]
    ...: y = sorted(x)

In [35]: x
Out[35]: [5, 7, 3, 38, 7]

In [36]: y
Out[36]: [3, 5, 7, 7, 38]

In [37]: xx = x

In [38]: xx
Out[38]: [5, 7, 3, 38, 7]

In [39]: id(xx)
Out[39]: 1635703548744

In [40]: id(x)
Out[40]: 1635703548744

In [41]: xx = x.copy()

In [42]: xx
Out[42]: [5, 7, 3, 38, 7]

In [43]: id(xx)
Out[43]: 1635703377480

In [44]: x.sort()

In [45]: x
Out[45]: [3, 5, 7, 7, 38]

2017년 9월 9일 토요일

[python] link

http://nullege.com/

--------------------------------------------------------------------------------
last updated: 2017/9/10

[python] MP3출력 pygame

[인스톨]
conda install -c cogsci pygame
https://anaconda.org/cogsci/pygame

[코드]
pygame.mixer.init()
pygame.mixer.music.load("file.mp3")
pygame.mixer.music.play()

[python] OpenCV 필터링 (라이브러리활용)

import numpy as np
import cv2

img = cv2.imread('demo.jpg')
print(img.shape, img.dtype)

cv2.imshow('input', img)
print("press anykey on the image")
cv2.waitKey(0)

height = img.shape[0]
width = img.shape[1]

dst = np.zeros((height, width, 3), np.uint8)
kernel = np.ones((5,5),np.float32)/25

print("filtering...", end='')
dst = cv2.filter2D(img,-1,kernel)
print("done.")    

cv2.imshow('result', dst)
print("press anykey on the image")
cv2.waitKey(0)
cv2.destroyAllWindows()

----------
http://docs.opencv.org/3.1.0/d4/d13/tutorial_py_filtering.html

blur = cv2.blur(img,(5,5))
blur = cv2.boxFilter(img, (5,5))
blur = cv2.GaussianBlur(img,(5,5),0)
median = cv2.medianBlur(img,5)
blur = cv2.bilateralFilter(img,9,75,75)

[python] OpenCV 박스필터링 (직접구현)

import numpy as np
import cv2

img = cv2.imread('demo.jpg')
print(img.shape, img.dtype)

cv2.imshow('input', img)
print("press anykey on the image")
cv2.waitKey(0)

height = img.shape[0]
width = img.shape[1]

dst = np.zeros((height, width, 3), np.uint8)
filter = np.ones((5,5))/25

print("converting...", end='')
for h in range(2, height-2):
    for w in range(2, width-2):
        sb = 0.0
        sg = 0.0
        sr = 0.0
        for y in range(-2, 3):
            for x in range(-2, 3):
                sb += img[h+y, w+x, 0]*filter[y+2, x+2]
                sg += img[h+y, w+x, 1]*filter[y+2, x+2]
                sr += img[h+y, w+x, 2]*filter[y+2, x+2]
             
        dst[h, w, 0] = sb.astype(np.uint8)    
        dst[h, w, 1] = sg.astype(np.uint8)
        dst[h, w, 2] = sr.astype(np.uint8)

print("done.")      
cv2.imshow('result', dst)
print("press anykey on the image")
cv2.waitKey(0)
cv2.destroyAllWindows()

[python] OpenCV 픽셀단위 처리 (그레이영상만들기)

영상 처리: 픽셀단위처리 - 그레이영상 만들기
--------------------
import numpy as np
import cv2

img = cv2.imread('demo.jpg')    #img는 numpy array
print(img.shape, img.dtype)

cv2.imshow('', img)
print("press anykey on the image")
cv2.waitKey(0)

height = img.shape[0]
width = img.shape[1]

gray = np.zeros((height, width, 3), dtype=np.uint8)

print("converting...", end='')
for h in range(height):
    for w in range(width):
        b = img[h, w, 0].astype(np.float)
        g = img[h, w, 1].astype(np.float)
        r = img[h, w, 2].astype(np.float)
     
        intensity = (b + g + r) / 3
        #intensity = intensity.astype(np.uint8)
     
        gray[h, w, 0] = intensity
        gray[h, w, 1] = intensity
        gray[h, w, 2] = intensity

print("done.")    
cv2.imshow('', gray)
print("press anykey on the image")
cv2.waitKey(0)
cv2.destroyAllWindows()

--------------------
b = img[:,:,0].astype(np.float)
g = img[:,:,1].astype(np.float)
r = img[:,:,2].astype(np.float)
gray = ((b+g+r)/3.0).astype(np.uint8)
--------------------

[python] OpenCV 인스톨, 영상읽기, 화면출력

[인스톨]
conda install -c menpo opencv3
https://anaconda.org/menpo/opencv3

[예제코드]

# 영상읽고 출력하기1
--------------------
import cv2
import numpy as np

img = cv2.imread('demo.jpg')
img.shape
img.dtype

cv2.imshow('', img)
cv2.waitKey(0)
cv2.destroyAllWindows()

# 영상 출력하기2
--------------------
from matplotlib import pyplot as plt

plt.subplot(111), plt.imshow(img), plt.title('input'),plt.xticks([]), plt.yticks([])
plt.show()

# subplot(111)
# 111: 1x1 에서 1번째 위치
# 121: 1x2 에서 1번째 위치
# 122: 1x2 에서 2번째 위치


2017년 9월 2일 토요일

[Win32] 시작코드

#include <windows.h> 
LRESULT CALLBACK WndProc(HWND, UINT, WPARAM, LPARAM); 

int WINAPI WinMain (HINSTANCE hInstance, HINSTANCE hPrevInstance,  LPSTR lpszArg, int nCmdShow) 

HWND hWnd; 
MSG msg; 
WNDCLASS WndClass;
WndClass.style = NULL; 
WndClass.lpfnWndProc = WndProc; 
WndClass.cbClsExtra = 0; 
WndClass.cbWndExtra = 0; 
WndClass.hInstance = hInstance; 
WndClass.hIcon = LoadIcon(NULL, IDI_APPLICATION); 
WndClass.hCursor = LoadCursor(NULL, IDC_ARROW); 
WndClass.hbrBackground = (HBRUSH)GetStockObject(WHITE_BRUSH); 
WndClass.lpszMenuName = NULL; 
WndClass.lpszClassName = "Hello"; 

if(!RegisterClass(&WndClass)) return NULL; 

hWnd = CreateWindow( 
"Hello", 
"My", 
WS_OVERLAPPEDWINDOW, 
CW_USEDEFAULT, 
CW_USEDEFAULT, 
CW_USEDEFAULT, 
CW_USEDEFAULT, 
NULL, NULL, hInstance, 
NULL 
);
 
ShowWindow(hWnd, nCmdShow); 
UpdateWindow(hWnd); 

while(GetMessage(&msg, NULL, 0, 0)) 

TranslateMessage(&msg); 
DispatchMessage(&msg); 

return msg.wParam; 
}

LRESULT CALLBACK WndProc(HWND hWnd, UINT mesg, WPARAM wParam, LPARAM lParam)

switch(mesg) 
{
case WM_DESTROY : 
PostQuitMessage(0); 
return FALSE; 

return DefWindowProc(hWnd, mesg, wParam, lParam); 


[python] zip, map, lambda, list

a = [1,2,3,4,5]
b = ['a','b','c','d','e']
for x,y in zip (a,b):
    print (x, y)
--------------------
1 a
2 b
3 c
4 d
5 e

----------------------------------------
import numpy as np
def func(x):
   return x * 2
b = map(func, [1, 2, 3, 4])
for x in b:
    print(x)
--------------------
2
4
6
8

* map 오브젝트는 리스트 같지만 원소에 직접 접근은 불가
* b[0] 사용 불가

----------------------------------------
a = lambda x, y: x * y
print(a(3, 4))
--------------------
12

----------------------------------------
import numpy as np
k =[
[11,12,13,14,15,16],
[21,22,23,24,25,26],
[31,32,33,34,35,36],
[41,42,43,44,45,46],
[51,52,53,54,55,56]
]
a = np.array(k)
print(a[::2,1:3:)])
--------------------
[[12 13]
 [32 33]
 [52 53]]

* a[start : end : step] // row에 적용
* a[start : end : step, start, end] // row, column에 적용