#include <windows.h>
LRESULT CALLBACK WndProc(HWND, UINT, WPARAM, LPARAM);
LRESULT CALLBACK BtnProc(HWND, UINT, WPARAM, LPARAM);
WNDPROC _fpBtnProc;
int WINAPI WinMain(HINSTANCE hInstance, HINSTANCE hPrevInstance, LPSTR lpszArg, int nCmdShow)
{
HWND hWnd;
MSG msg;
WNDCLASS WndClass;
WndClass.style = NULL;
WndClass.lpfnWndProc = WndProc;
WndClass.cbClsExtra = 0;
WndClass.cbWndExtra = 0;
WndClass.hInstance = hInstance;
WndClass.hIcon = LoadIcon(NULL, IDI_APPLICATION);
WndClass.hCursor = LoadCursor(NULL, IDC_ARROW);
WndClass.hbrBackground = (HBRUSH)GetStockObject(WHITE_BRUSH);
WndClass.lpszMenuName = NULL;
WndClass.lpszClassName = "Hello";
if (!RegisterClass(&WndClass)) return NULL;
hWnd = CreateWindow(
"Hello",
"My",
WS_OVERLAPPEDWINDOW,
0,
0,
320,
240,
NULL, NULL, hInstance,
NULL
);
ShowWindow(hWnd, nCmdShow);
UpdateWindow(hWnd);
while (GetMessage(&msg, NULL, 0, 0))
{
TranslateMessage(&msg);
DispatchMessage(&msg);
}
return msg.wParam;
}
#include <stdio.h>
#include <string.h>
LRESULT CALLBACK WndProc(HWND hWnd, UINT mesg, WPARAM wParam, LPARAM lParam)
{
static HWND hBtn;
static char szPos[256];
switch (mesg)
{
case WM_CREATE:
hBtn = CreateWindow("button", "",
WS_CHILD | WS_VISIBLE | BS_PUSHBUTTON,
0, 0, 100, 100,
hWnd,
(HMENU)999,
(HINSTANCE)GetWindowLong(hWnd, GWL_HINSTANCE),
NULL);
_fpBtnProc = (WNDPROC)GetWindowLong(hBtn, GWL_WNDPROC);
SetWindowLong(hBtn, GWL_WNDPROC, (LONG)BtnProc);
break;
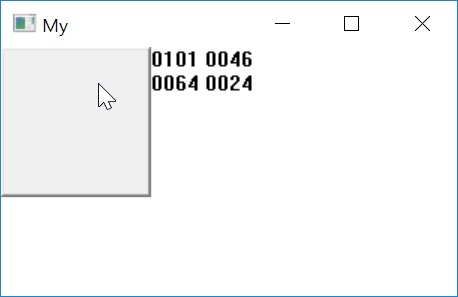
case WM_MOUSEMOVE:
HDC hdc;
hdc = GetDC(hWnd);
sprintf_s(szPos, "%04d %04d", LOWORD(lParam), HIWORD(lParam));
TextOut(hdc, 100, 0, szPos, strlen(szPos));
ReleaseDC(hWnd, hdc);
break;
case WM_DESTROY:
PostQuitMessage(0);
return FALSE;
}
return DefWindowProc(hWnd, mesg, wParam, lParam);
}
LRESULT CALLBACK BtnProc(HWND hWnd, UINT mesg, WPARAM wParam, LPARAM lParam)
{
static char szPos[256];
switch (mesg)
{
case WM_MOUSEMOVE:
HDC hdc;
HWND hParent;
hParent = GetParent(hWnd);
hdc = GetDC(hParent);
sprintf_s(szPos, "%04d %04d", LOWORD(lParam), HIWORD(lParam));
TextOut(hdc, 100, 16, szPos, strlen(szPos));
ReleaseDC(hParent, hdc);
break;
}
return CallWindowProc(_fpBtnProc, hWnd, mesg, wParam, lParam);
}